Monday, December 26, 2011

Some minor updates: Gyro Calibration / new GoPro Case

Due to the rainy and windy weather right now, there is not much time to fly and have fun.
I made some short flights in the past days but nopthing serious.

I had some pretty rough days in december. I was pretty occupied with my Taekwon-Do club and hat not much time for the ncopters.

But I managed to do some software tweaks:

I finished and perfected the acc autocalibration and I finally managed to restart the gyro calibration routine at startup if the copter has been moved durin calibration. Pretty handy...


Second small projekt was the revision of my fpv gear. I was unhappy with the bold camerahousing and decided to spend some money for the original GoPro skeleton case, this case is lighter and has the opprtunity to connect the video out plugs while the camera is in the case. Abolutely worth the money.
This way the camera is protecteds way better than beforce. Only drawback: The camera has to be mounted upside down but the gopro is capable of rotating the image live so I still can do fpv and all recordings are rotated too. *sigh*
Especially the lens is now secure. And besto of all it looks way sleeker now.

GoPro HD in skeleton case mounten on nDROiiD 2


My FPV deck is now complete. You can attach it in 20 secondes and convert an action Quad to a fpv gear in seconds.

Nils


Monday, November 28, 2011

Introducing the Inflight ACC Calibration

Hi,

I programmed a feature that allows to find the perfect hovering zero point for the ACC sensor while inflight.

At the Shreddiquette community I took part in programming the same procedure after an idea of a fellow programmer and I ported the idea to Multiwii.

Why:

  • In reality there is no flat surface, so calibrating the ACC on ground will bring you close to a good value but you still have to find the perfect trim by trial and error.
  • Every copter is different so a perfectly flat surface does no recognice the inaccuracies in a copter, COG, bent arms, askew pylons etc.
Doing this inflight makes sure you are defining the zero point while in a perfect stable hover

How:

  1. Arm the function with a stick combo (see below)
  2. take off and find the point of no drift (in acromode or in hovemode with TX-trimming)
  3. disarm via Aux1 and Aux2 (Aux disarming is a requirement) while flying, fon't worry there is a failsafe that prevents the engine from turning off while yu still have throttle > minthrottle. The offset is measured.
  4. Land and redo the combo to save the measured values. (be sure to undo the TX-trimming you did while flying in hovermode)
  5. Take off again and be happy ;-)
  6. You can do the combo again if you do not want to start the calibration anytime before taking off and do the measurement, to disarm the measurement. If you do not want to save the meausred value just do not do the combo. The values are lost after you cut power. You can always repeat the processover and over again  if you are unhapy with the result.


Stick Combo to arm/disarm the calibration.
You can find the code here:

http://code.google.com/p/multiwii/source/browse/#svn%2Fbranches%2Fjevermeister%2F1.9patch2%20-%20inflight%20ACC%2C%20global%20buzzer%2C%20failsafe%202


Nils

Tuesday, November 8, 2011

The Mail man was there: A working FlyduGPS

Today, I received a new Shipment from my sponsor  www.flyduino.com.

Two friends of mine started building their quadrocopters and use Paul's complete quadrocopter frame with MWC board and black flydumini.

I got some new reenforced 10" props and new brand new GPS bob.

GPS Bob kit as delivered by flyduino with my FMP04

After 10 minutes of soldering I had everything onboard, including the FMP04 and the Bob was ready to go:

ready FlyduGPS

Just a little adjustment in the multiwii code and I got a tight satellite fix inside of my living room near the window:
FlyduGPS in comparison to a Get em... bob I am currently testing

Satellite fix after just a few seconds

working MultiWii GPS code


detailed comparisons and testing coming soon...


Oh by the way: You should really buy the new 10" props from Flyduino they have improved a lot and the mounting is perfect now, I can hardly tell the difference to Mikrokopter props


Wednesday, November 2, 2011

Flyduino

I would like to introduce and thank my sponsor!


Paul from www.flyduino.com is supplying me with all the stuff I need to get airborne.
He also delivers the newest protoypes for my testing purposes - like the GPS bob or the new Flyduino v2.1.

He developed the famous Flyduino controller which is powering many many multicopters right now. Also he developed several boards and bobs and offers a lot of RC products for reasonable prices.
The quality of his products is outstanding and the service is great. He delivers fast and reliable and is offering great support. I can recommend this shop and his products.

My nDROiiD quadrocopter is using the following Flyduino products:


  • Flyduino v2.1 flight controller
  • Flydusense v2 Sensor Board
  • Flydubution Power distribution board.
  • Green and orange 8" and 10" props
  • GPS Bob prototype
  • Numerous plugs, pins, bolts and a Bosch BMA020 Accelerometer bought at flyduino.com

Thank you Paul!!!

FPV Action, GPS and axes

Hey,
some cool FPV Videos .... I am getting the hang of it.


I am optimizing the software right now. There were some very bad drift issues - so I think about replacing my BMA020 with another accelerometer.

I have a problem with the Mag, the motor currents distort the mag readings severely.

aaand:

Today I got a GPS Bob made by aBUGSworstNightmare from Paul from www.flyduino.com for testing purposes.
After some time of reading and understanding the pins I now have a working GPS onboard.
I am looking forward to try position hold and coming home functions!!!

Working satellite fix on the Copter 
a GPS bob
Additionally I ordered a FMP04 GPS Chip from Kinderkram to fit it into Flyduino's upcoming GPS Bob.

FMP04 GPS Chip


Last week I made some custom motor axis out of spring steel - no more bent axes!

selmade spring steel axes

Monday, October 10, 2011

FPV routine and parameter fixes

I spent the last days getting some routine in FPV flying. At the beginning I made the mistake to peek at the copter below the goggles to be sure where it flies. But this is not a good idea: You have to let go and dive into the experience and fly like if you are onboard - only doing so you can be sure to control the copter properly.

Tipps for beginners:
1. learn to fly the copter and be familiar with it's reactions
2. find plenty of space
3. perhaps bring someone to keep an eye on the copter while you fly and warn you if you are about to crash into something that is out of the FOV
4. DO NOT PEEK. Just concentrate onto the screen.

I had some problems with a wobble of death. After agressive maneuvers in stable mode the copter control escalates and I crash. 


After a tipp from the rcGroups forum I decreased Level P and the problem seems to be gone.
I have to make further testing to verify this.

Another troublesome device was the magnetometer. By installing it upside down and turned I had to alter the settings in the software. I had a hard time finding the correct values because I thought that turning the coordinate system is right: After a tipp from Alexinparis I found the correct values and now it is working perfect. The copter holds the heading like a charm.


#define MAG_ORIENTATION(X, Y, Z)  {magADC[ROLL]  = -X; magADC[PITCH]  = Y; magADC[YAW]  = -Z;}


Thursday, September 29, 2011

nDROiiD Back in the Air

Today I finished the works on the rebuild.

I finally installed the barometric sensor and the magnetometer.

Supersmall baro and mag


Sensors installaed on the back of the flydusense V2 by Paul Bake from www.flyduino.com


These Units work wonderfully and are so small, I don't have a problem hiding them beneath the flydusense.
It was a bit tricky to reprogram the magnetometer reading since it was upside down.
I found the perfect parameters for the baro by accident - It is hovering in place perfectly.

Nearly perfect parameters for my QuadX
Additionally, I added a GSM GPS tracker - this is quite an interesting gizmo - it can be programmed do sen my it's coordinates regularly per SMS or I can track it via GPRS.

TK02 GSM GPS Tracker

I choose the option to call it with my android phone and a couple of seconds later I get a SMS with GPS Date of it's current location.
With this data and the GPS in my phone I can find the copter easily,  I did some tests today and the result is promising - I need to get used to the unit though. I will do some hide and seek field testing tomorrow.

Next Step: Install a better hood for the copter.

Nils

Thursday, September 22, 2011

Rebuilding nearly finished

Hi there,

Paul from www.flyduino.com was so kind to send me a new Flyduino 2.1 for testing and I just soldered the pins onto the board and transferred the firmware, I only used the needed pins now and left the unused pins empty.
Partly assembled Flyduino

I also had some problems fitting my vibration dampeners to the Flydusense v2 while using the inbuilt dampeners. This nearly loose dampeners were the reason that my boards got separated from the copter after the crash because the threads were to short to get a good grip at the bolts..

I noticed that the bolts Paul sells in his shop fit exactly into the big holes the Flydusense v2 has.
Now the Flydusense is dampened and secured.

Perfect fitting


So be shure to head over to www.flyduino.com to order the boltes and the Flydusense ;-)

Tuesday, September 20, 2011

and Disaster strikes ... again!

Last weekend I was in Ostfriesland at my father in Law's house, he has a wonderful farm in the middle of nowhere.


After I did somecalibration flights to find better PID parameters I attempted to do a short FPV flight since there was pleeeenty of space around the house. I fired up the gear and climbed upa few meters, because I am not very good doing FPV yet I looked at the copter beneaht the FPV goggles and noticed that it has drifted off quite a bit. I tried to determine in which direction it was heading but it was to late, the wind had taken over command and it was flying further away from me, too late I decided to let it come down, I watched closely at the copter to get a clue where it crashed and ran to my car, unfortuneally the assumed crash site was on the other side of a channel. I raced around the channels but did not find it. Than I headed back to the other side of the channel and searched between the two channels on this small peninsula - nothing.
I crossed the next channel an searched a little swamp and the fields there - still nothing. I thought I hit a channel and this was my second copter gone in two weeks. I sorted out which of my friends gets which of my spare parts and thought about spending more time Windsurfing and with my girlfriend... I gave up again. Because the GoPro was onboard this was a real disaster....)


Then I remembered an important fact: THE FPV GOGGLES!! I watched through the googles: static, DAMN - I raised the antenna from my shoulder and I got a black picture: The TX of the FPV system was still operating!! Yippieh!
So the copter hit ground and not water - but where the frack was it...

I remembered the fact that 5,8 GHz signal is very sensitive on blocking so I put my hand before the antenna and I determined the copter was north of my position. So I went northwest and did a second bearing to determine the crashsite, I searched for 15 minutes. In the meantime my girlfriend and her parents came to help and brought their dog - but this dog was busy hunting rabbits so he was no help.

After 10 minutes I circled around and was nearly at the point where I first looked , north of the first channel and THERE SHE WAS - or there was what was left of her. She was hanging in a sheep fence just 1 meter to the bank of the channel and about 800m where I was standing as I started the flight , If there had not been a fence...


x: I was standing here to fly
1. my first searchnode
2. second attempt to find it.
3. I remembered the FPV system here and got a fix
4. I circled around here and spotted the crashsite
red lines: my driving route

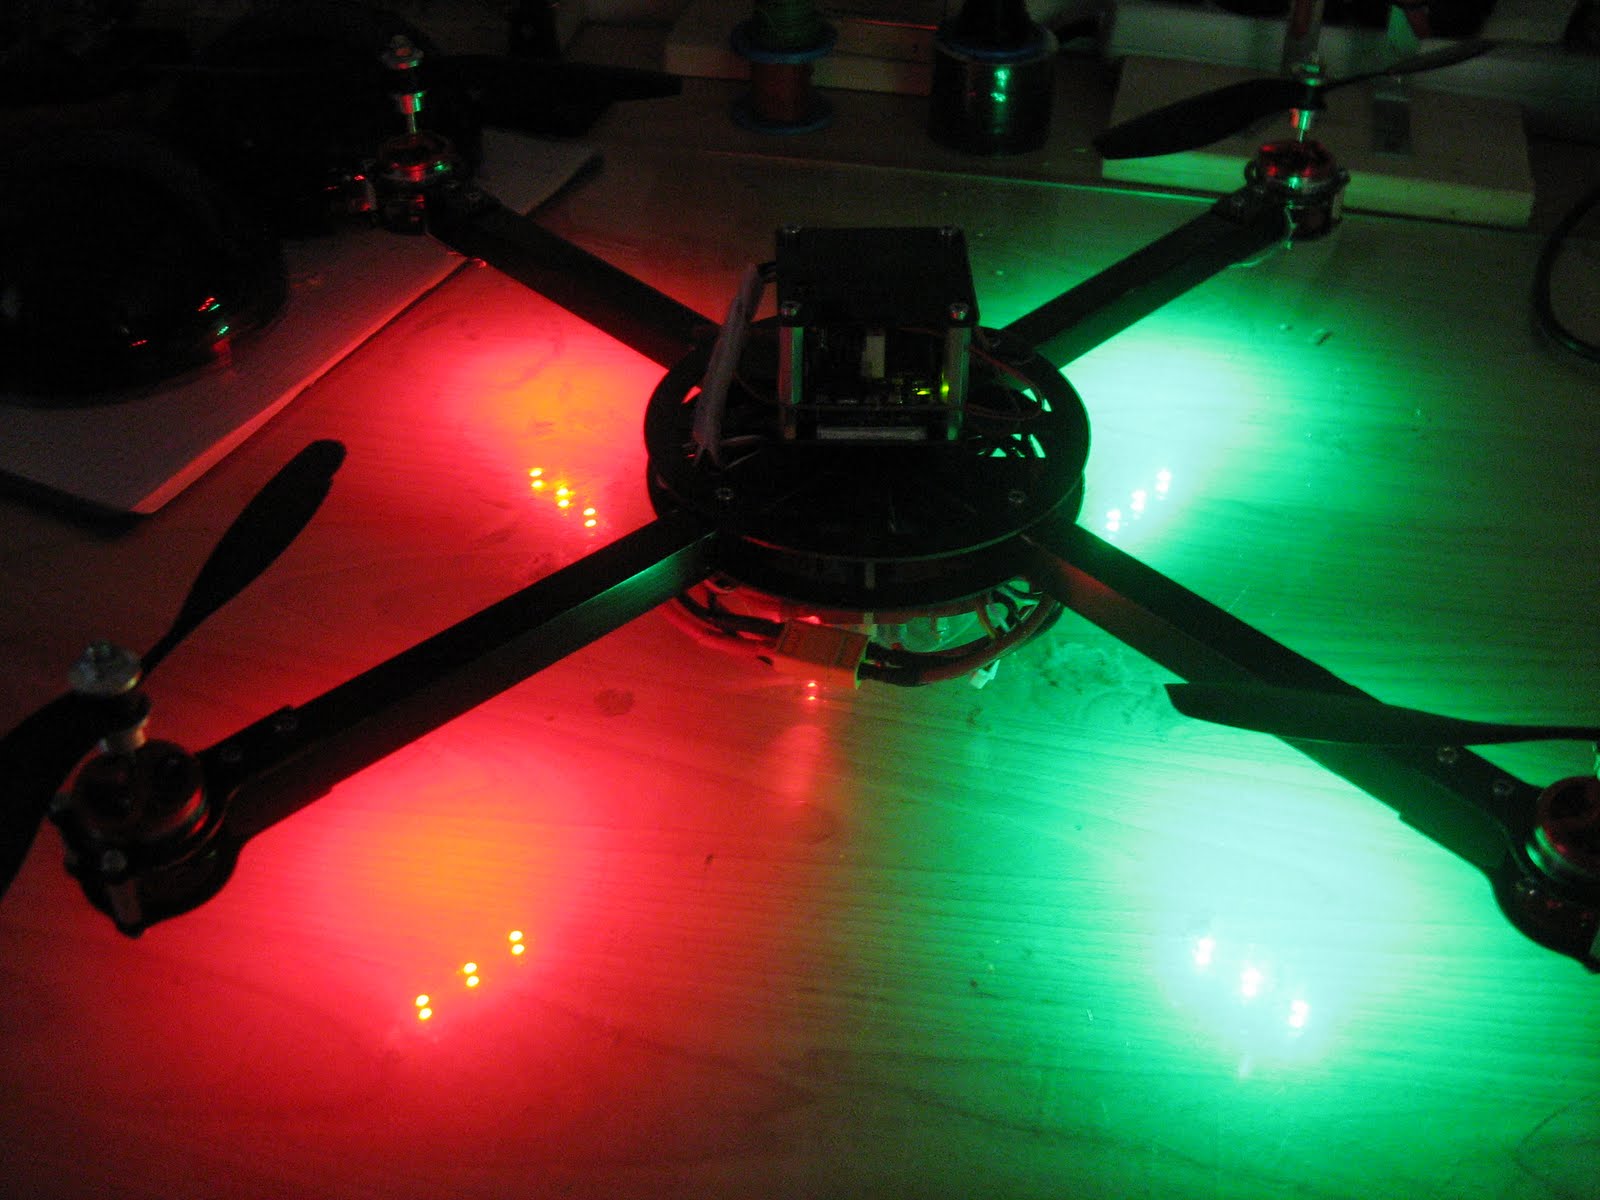
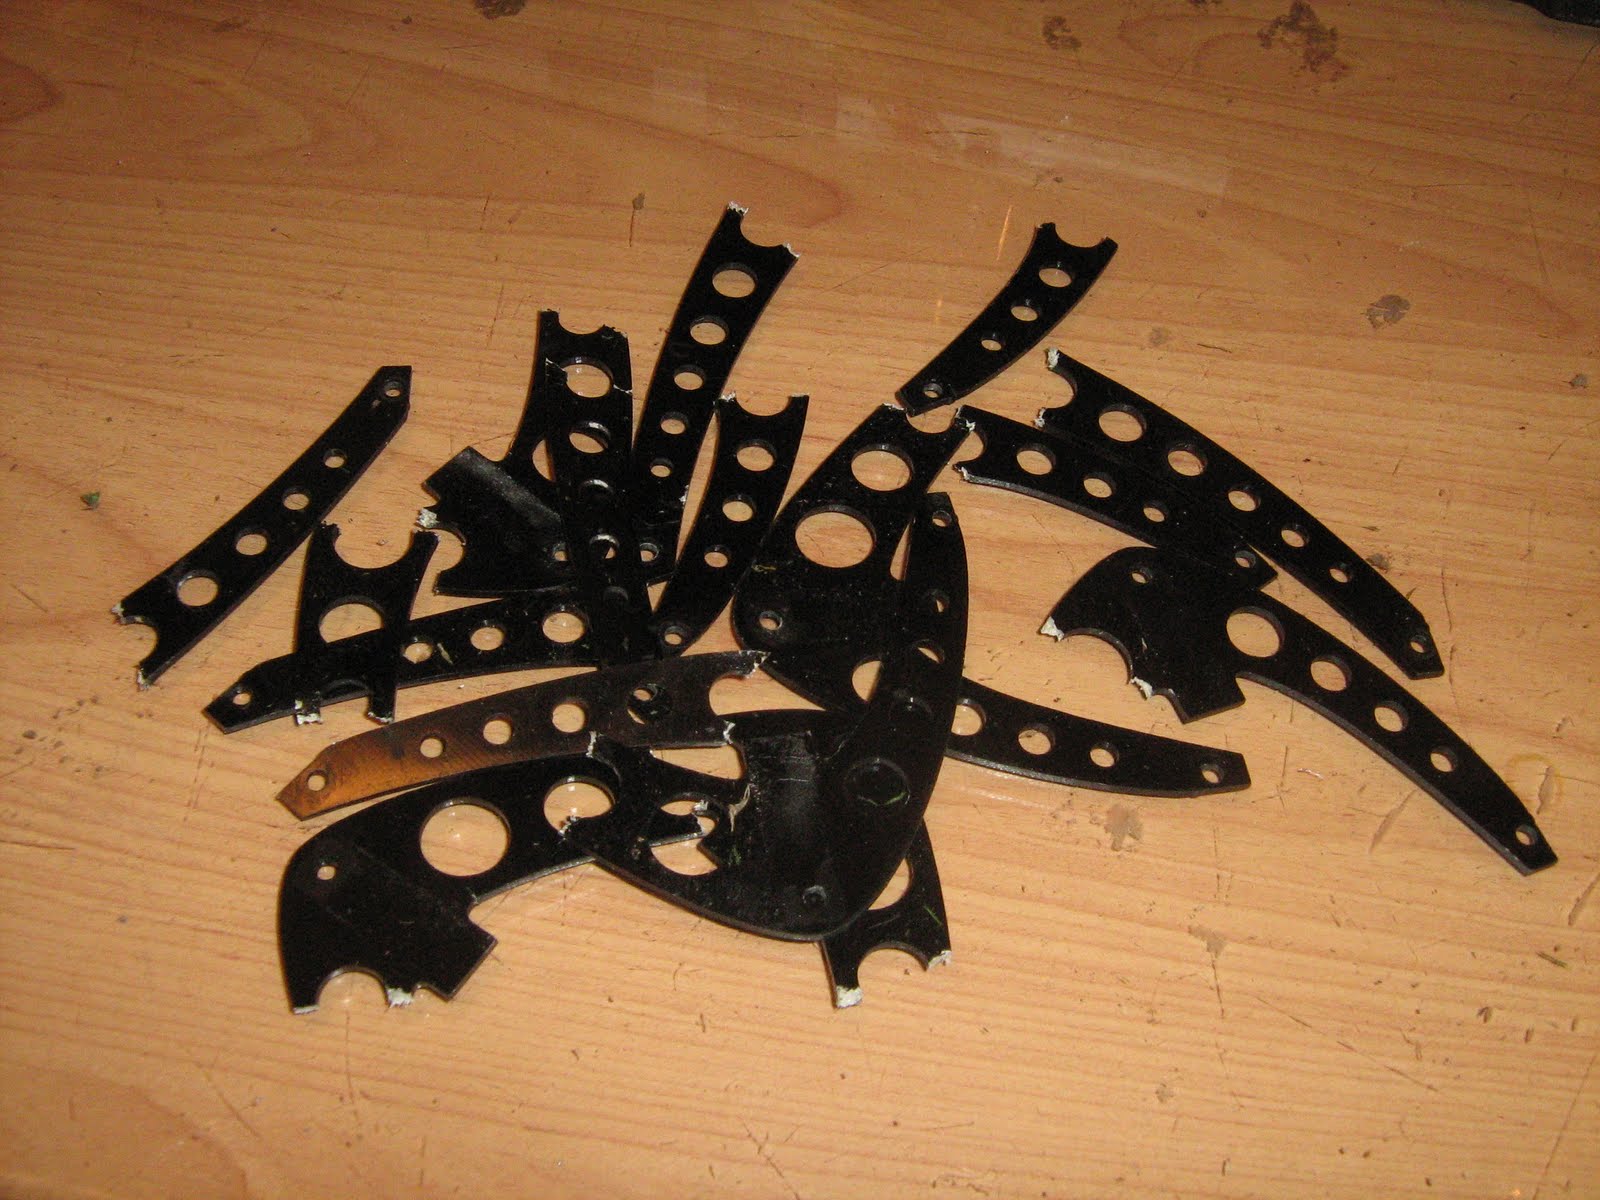
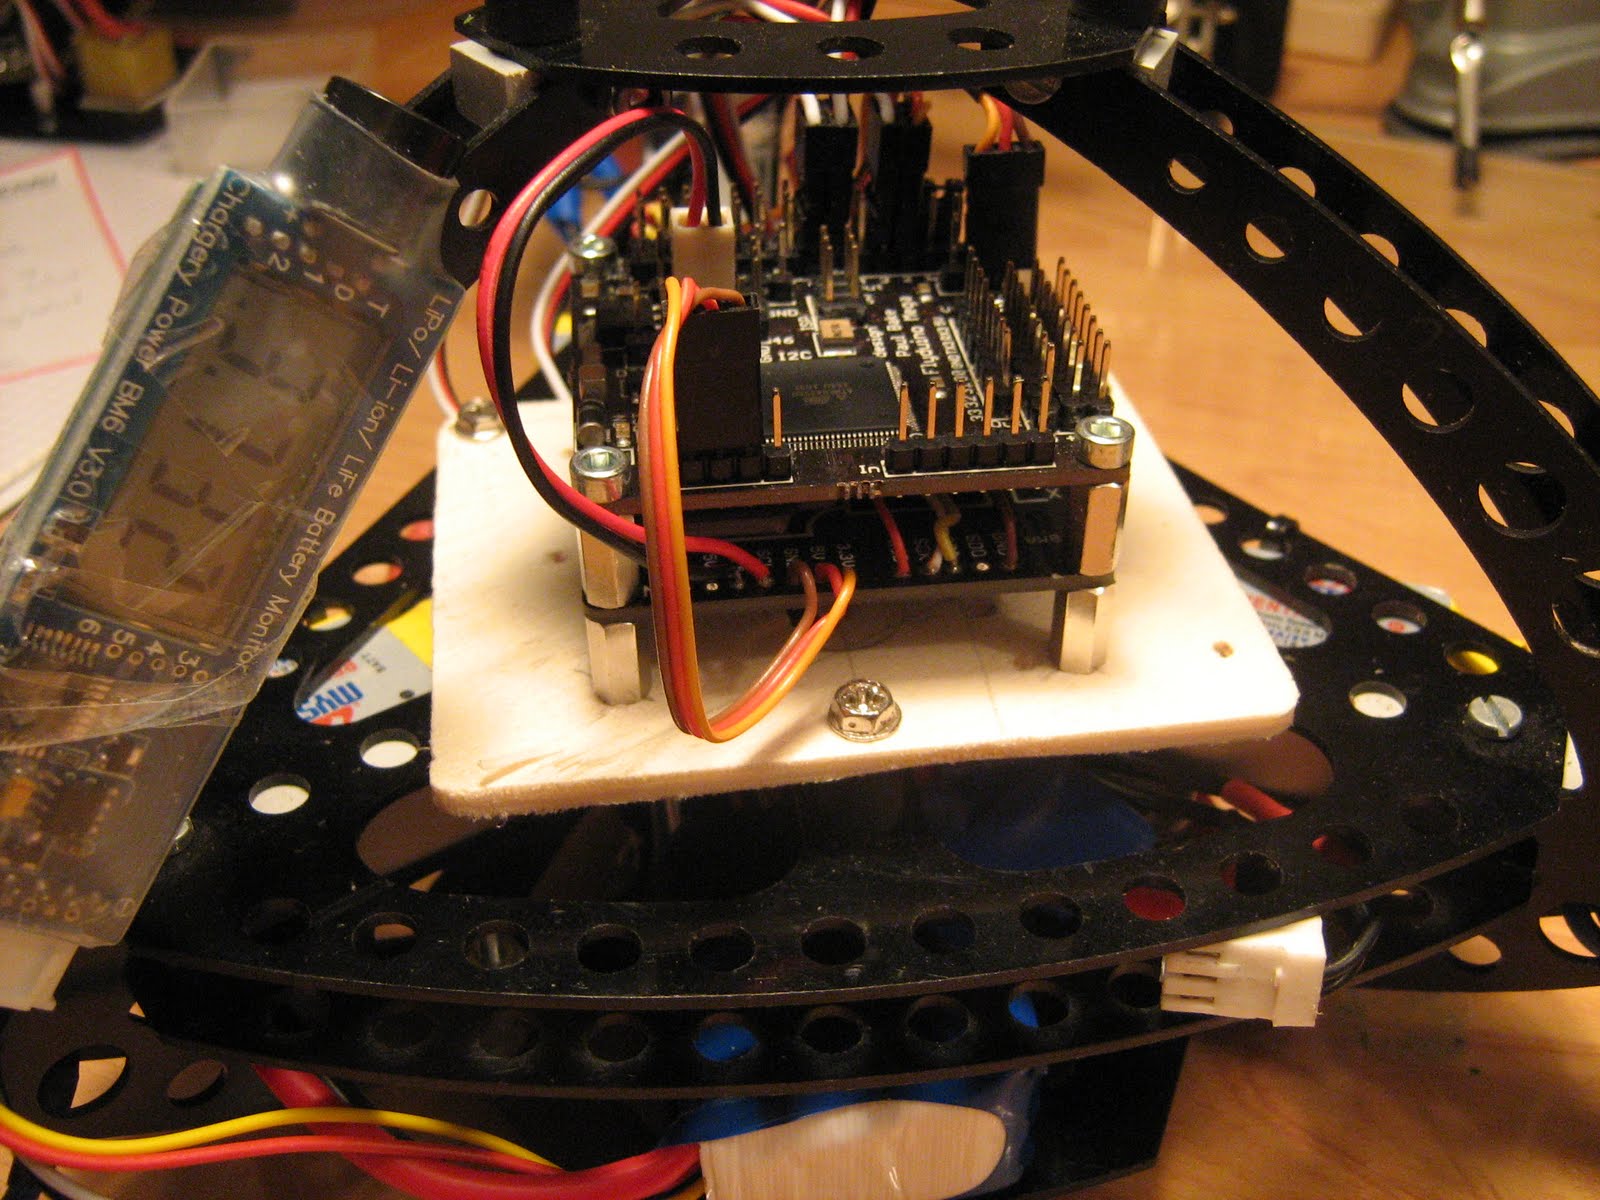
The rear pilons were badly bent, all props were broken, one Motor wos ripped off, the flyduino, and the flydusense were severed from the centerplate and the flyduino was without power (so no buzzer "Find me!" signal), the Lip was lying several feet away from the copter but still connected to the TX of the FPV  (how lucky can a man be??) The GoPro was 3 Meters away the protective housing of the Gopro was shredded but the cam was intact and is working.

I collected all parts and double checked the area (very important: There are cows on the meadows - the can choke on these pieces) I got every single part and was heading home lighthearted. I just saved a lot of money.

Back home I checked the equipment: Despite the motor everything was still working. I was lucky that she crashed rear first otherwise the gopro would be no more.
The Pins of the flyduino were badly bent but no shortcircuit happened. The motors where still running and the sensors were doing their work. I logged in to giantcod and ordered 6 new motors and got me a cold beer.


I was very astonished that the alu was bent like hell, even the holes but the epoxy was completely unharmed.

Lessons learned today:
- leanr your lessons man!!! Still no telephone number on it.
- pull the breaks as soon as possible I should have turned of the engines right in the moment I noticed the drift.
- GPS GPS GPS! I need GPS!!
- I definetely need a tracking device
- I need to make shure that the Lipo stays in place and that it can still power the electronics after a bad crash
- better protection of the flyduino tower it got ripped of like - i dunno what.


After all it was a lucky day - The copter is almost back in the air - I still need a replace motor and cochones to fly again.

Nils
ps.: Thank god for the FPV system!!!!

Sunday, September 11, 2011

The sad ending and the new beginning

Some of you might wonder why I bought so much new stuff.
Well this is why:

Last week disaster striked.
I went to the beach to fly my copter an do some nice FPV while filming the giant unifeeder ships, I forgot a screwdriver to mount the FPV equipment.
So I was left with some flights around the picknick blanket.
An hoer later we packed and I wanted to turn one more round, seconds before landing I noticed that the copter went a little bit to far, I was over an open air restaurant so I throttled up, (I did not want to hurt someone).
This was the moment I realized that I had lost orientation. I could not see where the front of the copter was.
I tried some Pitch and roll amneuvers to get it back but it was hopeless.

Then I did some a very stupid thing, I went into dive and ran towards the copter. It crashed somewhere in the woods in an old castle ruin at the shore - we searched for hours but it was hopeless - old ruins, woods, thorns, high grass and old industrial buildings and not a single clue where in this area it could be.

The most stupid thing I did was to mute the buzzer seconds before tekeoff because I reprogrammed the voltage code and made a mistake  so it buzzed all the time during flight.

I wanted to cry because I put so much money and work in it - I just added the baro and the mag.

I thought about giving up this hobby but then I enterd eBay/Flyduino.com/and Hobbyking and about 6 Days later this is the result:


proudly present NTMC05 "nDROiiD 2"
Since the first copter was so good I did only minor modifications:
- Flydusense V2
- mounting hole for buzzer
- wiring for LEDs now more clean
- lots of improvements regarding wiring and drilling
- HK SS18A ESC
- coloured 8"/10" props from Flyduino
- no more QuaroPPM because the HK TR6A delivers a Summ PPM signal
The copter is built more accurate because I got more skilled by building the first one I included all the learned lessons from the old nDROiiD.


The most important lessons I learned from the crash:
- always put your Phone number on the copter
- NEVER mute the buzzer
- include a lost model buzzer routine that can be switched on and off
- include GPS tracking
- never fly over terrain that you do not know well
- always keep your eyes on the copter while it crashes
- NEVER GIVE UP (thanks to the guys in the RCGROUPS thread for the support)

The first stunt and FPV flights are already done and I am quite happy with the results. The new coloured props are a great help and the copter feels a little bit better in the air. Still some PID tuning to do but there is hope...


Tuesday, September 6, 2011

Tiny new friends

Today two new sensors arrived, I ordered a BMP085 barometric sensors and a HMC5883L magnetometer from eBay.
Their breakout boars are only half the size of the sparkfun versions. The mag is only 6mm by 6mm

baro and mag: tiny tiny


I am looking forward to test them this weekend, the will fit on the Flydusense V2 and everything will look tidy and polished.

Sunday, September 4, 2011

New Flydusense V2

Paul from www.flyduino.com sent my a new Version of his Flydusense.

This board is round, so it can be mounted in different directions (good for Quad+ pilots) and it has inbuilt vibration dampeners.
A connection for every kind of IMU is onboard plus a voltage divider a LLC and a LED driver.

I started wiring it up and the result can be seen below

Flydusense V2 out of the box

Flydusense V2 with genuine WMP and a Bosch BMA020


Friday, August 19, 2011

Baro, bluetooth and compass installed

A few days ago´Stefan Watterott deliverd my 3 new goodies for nDROiiD.

BMP085 barometric sensor on breakout board
Triple Axis magnetometer HMC5883L on breakout board
Sparkfun Bluetooth mate Silver

After som thinking about installation and some trouble with WinXP. I got it all set up.

I mapped Aux2 to the magnetomeer and to the baro.
If I activate the compass the current heading is stored and the copter tries to hold the heading untilI do some yaw action again.
The baro is enabling the copter to hold it's altitude, if I climb up to the desired height, I i switch the button and it is hoklding height until I move the trotthle out of a deadband. (the deadband is for emergency purpose).

The baro and the compass already hooked up and in a shrinking tube on the centerplate

The MultiWii GUI showing the new sensors in action

The bluetooth mate is a very handy fella, not only can i connect the copter to my PC for setting up parameters or transferring new firmware, I can connect it to my Motorla Droid or to my Archos Pad to change parameters on the fly while in the field or seeing flight data whily flying.

My Droid is connected to the nDROiiD and is showing PID params


Thursday, August 18, 2011

Whoa whhoa whoa FPV!!!

I am getting the hang of it.
I did my first longer FPV flight yesterday: 3 LiPos, 0 Crashes

It was a great experience, I flew out of sight and very high, chased a cat and nearly lost my tricopter becaus I couldn't find back.


as you might have noticed: This Blog is now on english  (I try my best) ;-)

Nils

Monday, August 8, 2011

nDROiiD ist fertig


Nach ca. 3 Wochen Bauphase ist es gestern Abend endlich soweit gewesen:

nDROiiD hatte seinen Jungfernflug.

Mein dritter Multikopter und erster Quadrocopter flog wie eine eins.
Pünktlich mit dem release von Alex's v1.8 des MultiWii Codes (an dem ich auch einen klitzekleinen Beitrag geleistet habe) hob der neue Vogel ab.
Er fliegt sich sagenhaft, zusammen mit den Verbesserungen am Code sogar noch deutlich besser als vorher.

Der Rahmen besteht wieder aus einer selbstentwickelten GFK Platte, diesmal habe ich 15mm Alu-Ausleger verwendet damit die Kabel innen liegen können, die Motoren haben ihren eigenen GFK Schutzkorb gegen Abstürze.
Die Elektronik liegt in einer schwarz gefärbten Acrylglaskugel und im abflugfertigen Zustand ist kein einziges Kabel mehr zu sehen. Genau das war auch das Ziel.
Da meine FPV Halterung noch nicht fertig ist, folgen Video demnächst.

Hier ein paar Bilder:


Gefräste GFK Motorhalter sorgen für Sicherheit

Gepufferter Sensorbob und gepanzerter Flyduino, leichter Zugang zum USB

Abdeckplatte abgenommen

Flydubution dient als Verteiler und als Batteriehalter, Plastik als Spritzschutz

LED Beleuchtung zur Lageerkennung...

...und für Ooohs und Aaaahs.

Sunday, August 7, 2011

Das beinahe Ende von ViiP3R....


Das passiert wenn in 30m Höhe ein Motorregler ausfällt und die Schwerkraft auf einmal versucht Tricopter zu fliegen.
Da hält selbst das Stärkste Exoskellet nicht mehr, es hat fast den Flyduino erwischt, es hat ein paar Pins verbogen und fast die Platine zerbrochen - aber zum Glück hat der Rahmen die meiste Energie aufgefangen.

2 stunden Später war ich wieder in der Luft...

Monday, July 25, 2011

Neuaufbau: Aus Vip3r wird Viip3r

Nachdem der Flyduino angekommen ist war ich fleißig und habe alles unter Vollgas zusammen gebaut.

Als erstes habe ich den Flyduino zusammengebaut.

Flyduino

Danach war das Sensorboard mit BM020 und Nintendo Wii Motion Plus dran:


Einzelteile Sensorbob
Fertiger Sensorbob
Dann war die Flydubution zur Spannungsverteilung dran:

Flydubution
Die Inbetriebnahme hat reibungslos geklappt, ich habe die Multiwii Software aufgespielt und alle Sensorwerte waren OK, die GUI ist auch wirklich sehr komfortabel.

Fertige Steuerung

Die Herausforderung war nun Vip3r zu zerlegen und die TriGUIDE gegen den Flyduino zu ersetzen. Und das hat auch tadellos geklappt, ich musste lediglich einige Parameter im Code anpassen und fertig war die Tricoptersteuerung:

Viip3r
Nachdem die Steuerung angeschlossen und eingebaut war habe ich mich gleich an den Erstflug gewagt.
Ich habe damit gerechnet, dass die Parameter total falsch eignestellt sind und der TRI total unruhig sein würde und praktisch nicht zu fliegen, was aber dann passierte übertraf alle meine Erwartungen.
Der Tricopter fliegt besser als je zuvor.

Was als erstes auffiel, war, dass die Steuerung viel sanfter und gleichmäßiger ist als beim TriGUIDE. Auch schwebt der Tricopter viel ruhiger, was wohl an der Steuerung liegt. Alles in allem ging alles erschreckend glatt über die Bühne.

Jetzt ging es also ans eingemachte, Probleme Finden und eliminieren:
  • Das Failsafe funktioniert nicht mit meiner QuadroPPM12, so dass bei einem Funkausfall der Copter einfach mit dem letzten Steuerbefehl weiterfliegt. Das habe ich geändert, jetzt wird das Failsafe ausgelöst, wenn keine Änderungen mehr auf den Kanälen sind. Das ist noch niocht perfekt aber ein Funkausfall wird zu 100% erkannt. Theoretisch kann es aber vorkommen, dass eine inaktivität als Funkausfall gedeutet wird.
  • Ich habe für den Tricopter noch ein externes Board gebaut, auf dem sich ein Spannungsteiler zur Spannungsmessung und ein Piepser befinden, so kann ich die Spannung im Flug mit dem Controller messen und in Stufen über den Pieper warnen, auch werden Steuerbefehle und Bootsteps über den Pieper signalisiert, darüberhinaus habe ich einen Funkausfall mit Piepsen bedacht. Es wird  nun ejde wichtige Info mit einem Piepen quittiert.
  • Nächster Schritt war die Ansteuerung der Nick/Roll Kompensation, war bei der alten Steuerung hierfür eine Eigene Programmierung und eine eigene Stromversorgung der Servos Nötig, so war hier alles schon fertig, ich habe noch ein Stromverteilerboard gelötet und die Parameter für Drehwinkel in der Steuerung eingestellt und fertig war die Kompensation. Funktioniert sogar besser als vorher.
  • Jetzt muss ich den Code nur mehr verstehen um meine weiteren Änderungen einzubauen

Jetzt ist zu klären ob ich mit dem Tricopter anch Fehmarn fahre oder ob ich es bis zum WE schaffe meinen QuadroX fertig zu bauen.


Monday, July 18, 2011

Flyduino ist da

Heute ist der Flyduino zusammen mit den Platinen für Sensoren und Spannungsverteiler gekommen.

Da ich heute Urlaub hatte, habe ich den ganzen Morgen damit verbracht das ganze zusammen zu löten.
Widererwartend funktioniert das ganze auch sehr gut.

neue Teile

Flyduino
Flyduino fertig

Flydubution
Sensor Bob
Sensorbob Fertig

Fertig! 

Fertiger Flyduino Tower


Leider macht die Funke wieder Ärger, die Endwerte sind nicht niedrig bzw. hoch genug. Jetzt muss ich mir was ausdenken um dies im Code zu korrigieren.


Work in Progress, noch 10 Tage....